WordPress
Background
In the early 2000’s I hosted many multi-site WordPress web sites. Additionally, I authored a number of extensions, themes, and plug-ins. By the end of the decade, I was mostly out of this business due to security and latency issues with both PHP and WordPress. Well here we are in 2022 and a club I joined asked if I could help with their website, I said yes. Lo and behold, the site they have been building for the past year is WordPress. Clearly, I am no longer an expert in PHP or on WordPress, nor can I speak to their latency or security, but I can certainly help them.
They currently have a domain, host, published site, and a staging site. I will get access to those items at our next meeting but I also need to get up to speed on PHP and WordPress.
Introduction
The best way to get up to speed, is to do. So let’s spin up a WordPress site with minimum effort. Amazon Web Services (AWS) has the Lightsail service for exactly this use case. It is reasonably cheap, starting at $3.50 per month (see latest prices). I already have an AWS account, so this tutorial will only cover the actual creation, setup, and initial usage of WordPress using Lightsail.
Creation
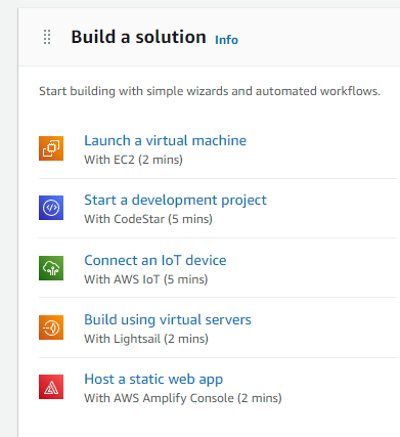
From the Console Home in AWS, choose Build using virtual servers in the Build a solution section.

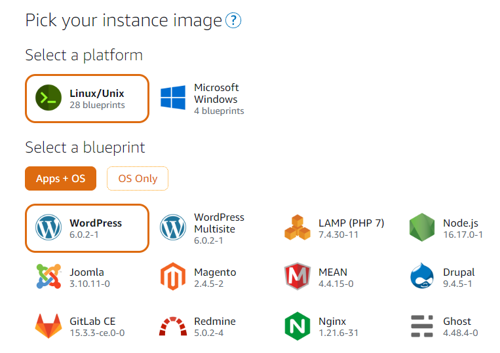
Select your machine type, (typically Linux) and the blueprint (in this case, WordPress).

Look aver the remaining options, choose your instance plan, and then Create Instance. More detail on the various options is available in AWS Get started with Linux/Unix-based instances in Amazon Lightsail.
Setup and connecting
Once your instance is created, you should see it available in the Lightsail Instances console. Click on the instance, to view its various statuses. If it is not already running, start it, and give it a few minutes to fully boot.
View the WordPress site in the browser at http://Public_IP/. The public IP address is available from the Connect tab of the Instance viewer.
Create and attach a static IP address
Lightsail automatically assigns an IP address each time an instance is started. If you plan on using your instance for more that just a quick test, it is wise to attach a static IP address. This will allow using the same IP address over a long-term and allows mapping a domain name to you new site.
Select the Networking tab from your Instance’s console. Under the listed Public IP, click on + Add a static IP and follow the instructions. Now use this new attached static IP as your Public_IP.
Usernames and passwords
We still need a few items before we are ready to go. Some of these are from Quick start guide: WordPress on Amazon Lightsail.
The application passwords are randomly generated during the deployment process and stored in a file on the server.
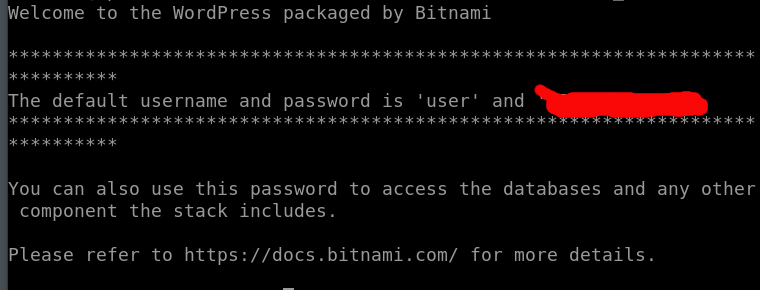
- These passwords can be retrieved by SSH. From the Connect tab, click Connect using SSH which opens a new window. Next enter
sudo cat /home/bitnami/bitnami_credentials. This returns the application password as shown in the figure.

- The initial username for WordPress administration is user.
- The username for SSH is bitnami.
- The username for MariaDB/MySQL is root.
Connect to WordPress
Browse to http://Public_IP/wp-admin/. Enter the username and password. The first thing to do is add a new user and give Administrator role. Then log out and login as the newly created user. Next remove the username user from Administrator, I just give it no role. Now you are ready to start using your site.
Connect using SSH
The typical usage for SSH connections is using the program PuTTY. Here we will setup PuTTY for both SSH and SSH tunnel usage. See Connect With An SSH Client for details of the listed steps
- Obtain PuTTY
- Convert your PEM private key to PPK format.
- The PEM key is the one that is downloaded when you click Download default key from the Connect tab.
- I typically add a passphrase while saving the PPK key.
- Configure PuTTY.
- Save the Putty session.
Now we’ll setup the SSH tunnel.
- Load your previously save session
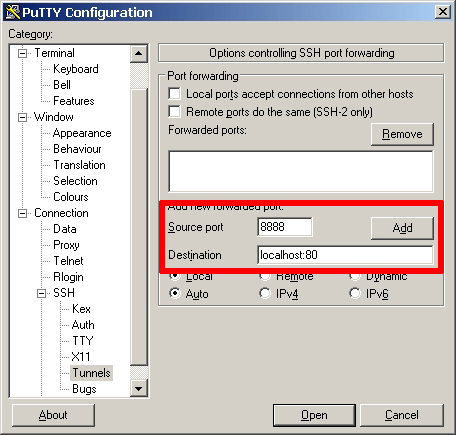
- In the “Connection -> SSH -> Tunnels” section, add a new forwarded port using the following values: Source port: 8888 and Destination: localhost:80.

- Click the “Add” button to add the secure tunnel configuration to the session. You’ll see the added port in the list of “Forwarded ports”.
- Save the session with a new name.
Now we can both connect to the server using SSH and also use a secure tunnel onto the server for port forwarding. We will use the SSH tunnel in the next section.
Connect to phpMyAdmin
phpMyAdmin allows for access to and management of the database server.
- Connect to your server using the secure tunnel session you just created in PuTTY.
- Determine whether the server is running MySQL or MariaDB.
test -d /opt/bitnami/mariadb && echo "MariaDB" || echo "MySQL". This is useful when looking up features and documentation. - Access phpMyAdmin by opening a browser and entering the URL http://127.0.0.1:8888/phpmyadmin. This is forwarded through the secure tunnel onto your server for local (and secure) access.
- Enter the username and password at the login screen.
Add a domain and HTTPS
Domain
This is not specific to AWS, in fact, I do not use AWS to manage my domain names. Generally, you change your A Name records to point to your Public_IP. Do this for the base domain and any specific or wildcards you wish. Once you have verified that your domain name points to your Public_IP, you can add a certificate for HTTPS usage. Verify this by using the command line tool NS Lookup
shell> nslookup yourdomainname
Server:  RAC2V1S
Address:  192.168.1.1

Non-authoritative answer:
Name:    yourdomainname
Address:  Public_IP
HTTPS
It is easiest to use Let’s Encrypt certificates and allow the bitnami tool to configure and manage this automatically. Open a Putty connection into your server and run the following command sudo /opt/bitnami/bncert-tool, then follow the prompts as shown below.
> sudo /opt/bitnami/bncert-tool

----------------------------------------------------------------------------
Welcome to the Bitnami HTTPS Configuration tool.
----------------------------------------------------------------------------
Domains

Please provide a valid space-separated list of domains for which you wish to
configure your web server.

Domain list []: yourdomainname www.yourdomainname

----------------------------------------------------------------------------
Enable/disable redirections

Please select the redirections you wish to enable or disable on your Bitnami
installation.

Enable HTTP to HTTPS redirection [Y/n]: y

Enable non-www to www redirection [Y/n]: n

Enable www to non-www redirection [Y/n]: y

----------------------------------------------------------------------------
Changes to perform

The following changes will be performed to your Bitnami installation:

1. Stop web server
2. Configure web server to use a free Let's Encrypt certificate for the domains:
yourdomainname www.yourdomainname
3. Configure a cron job to automatically renew the certificate each month
4. Configure web server name to: yourdomainname
5. Enable HTTP to HTTPS redirection (example: redirect http://yourdomainname
to https://yourdomainname)
6. Enable www to non-www redirection (example: redirect www.yourdomainname
to yourdomainname)
7. Start web server once all changes have been performed

Do you agree to these changes? [Y/n]: y

----------------------------------------------------------------------------
Create a free HTTPS certificate with Let's Encrypt

Please provide a valid e-mail address for which to associate your Let's Encrypt
certificate.

Domain list: yourdomainname www.yourdomainname

Server name: yourdomainname

E-mail address []: youremail

The Let's Encrypt Subscriber Agreement can be found at:

https://letsencrypt.org/documents/LE-SA-v1.3-September-21-2022.pdf

Do you agree to the Let's Encrypt Subscriber Agreement? [Y/n]: y

----------------------------------------------------------------------------
Performing changes to your installation

The Bitnami HTTPS Configuration Tool will perform any necessary actions to your
Bitnami installation. This may take some time, please be patient.

----------------------------------------------------------------------------
Success

The Bitnami HTTPS Configuration Tool succeeded in modifying your installation.

The configuration report is shown below.

Backup files:
* /opt/bitnami/apache/conf/httpd.conf.back.202210112205
* /opt/bitnami/apache/conf/bitnami/bitnami.conf.back.202210112205
* /opt/bitnami/apache/conf/bitnami/bitnami-ssl.conf.back.202210112205
* /opt/bitnami/apache/conf/vhosts/wordpress-https-vhost.conf.back.202210112205
* /opt/bitnami/apache/conf/vhosts/wordpress-vhost.conf.back.202210112205

Find more details in the log file:

/tmp/bncert-202210112205.log

If you find any issues, please check Bitnami Support forums at:

https://github.com/bitnami/vms

Press [Enter] to continue:
I’ve not had any problems using this method but if you do run into problems, see https://docs.bitnami.com/aws/how-to/understand-bncert/.
Create backups
It is recommended to backup your data and servers regularly. This may be done using AWS snapshots from the Snapshots tab. I do recommend using a snapshot for the full server prior to doing major upgrade work on the server. Otherwise, manage your backups via file for more certainty.
Open a Putty connection into your server and run the following commands:
cd backups. If you receive the message, -bash: cd: backups: No such file or directory, then you need to first create this directory usingmkdir backups. Now change to the directory using the initial command.- Verify your present working directory with
pwd, you should receive the response /home/bitnami/backups. - Back up all of the databases with
mysqldump -A -u root -p > backup_YYMMDD.sql, you will need to enter the password for root which we saved earlier in this tutorial. *YYMMDD represents the date of backup. For example December 11, 2024 is 241211. - Back up the Bitnami Wordpress stack which includes all of your WordPress uploads, plugins, and settings; along with the web server configurations.
- Stop all running servers,
sudo /opt/bitnami/ctlscript.sh stop - Archive the files,
sudo tar -pczvf application-backup_YYMMDD.tar.gz /opt/bitnami - Restart the servers,
sudo /opt/bitnami/ctlscript.sh start
- Stop all running servers,
- Copy the backups to a remote computer. To copy them to my local windows computer, I use WinSCP. This connects using the same private key as Putty.
- If needed, delete the backup files from your server.
Location of interesting files
On the Bitnami server, the files may be located differently than you expect. Some file locations may depend on the type of Bitnami server you are running. Use the following command to determine this
echo "Approach A: Using system packages." || echo "Approach B: Self-contained installation."
I am using Approach A and will only indicate those file locations in this document. If you are using Approach B, look up the source documents.
- WordPress The WordPress files that are served are located in /opt/bitnami/wordpress.
- PHP Configuration The PHP configuration file is located at /opt/bitnami/php/etc/php.ini
- MariaDB Configuration located at /opt/bitnami/mariadb/conf/my.cnf
- MariaDB Log located at /opt/bitnami/mariadb/logs/mysqld.log
- Apache Configuration located at /opt/bitnami/apache2/conf/httpd.conf
- Apache main virtual host, /opt/bitnami/apache2/conf/bitnami/bitnami.conf
- Apache virtual host for SSL, /opt/bitnami/apache2/conf/bitnami/bitnami-ssl.conf
- Apache additional virtual hosts, opt/bitnami/apache2/conf/vhosts/
Restart services
sudo /opt/bitnami/ctlscript.sh restart
Conclusion
Your site is now fully ready to get started. What remains is to work on the WordPress, themes, plugins, extra configurations, and finally content posts. These are not covered in this tutorial.
Some documentation links
- https://mariadb.org/documentation/
- https://docs.bitnami.com/aws/apps/wordpress/
- https://aws.amazon.com/getting-started/hands-on/launch-a-wordpress-website/
- https://docs.bitnami.com/aws/apps/wordpress/administration/backup-restore-mysql-mariadb/
- https://docs.bitnami.com/aws/how-to/understand-bncert/
- https://docs.bitnami.com/aws/apps/wordpress/administration/increase-upload-limit-php/
- https://docs.bitnami.com/aws/apps/wordpress/get-started/understand-default-config-mysql/
- https://docs.bitnami.com/aws/apps/wordpress/get-started/understand-default-config-mariadb/